Quick answer
Measure the widest part of the toilet (usually the tank), the height to the top of the tank lid, and how far the tank sticks out from the wall. Choose a unit whose inside width is at least 2 inches wider than the toilet and whose lowest shelf sits a few inches above the lid so you can still lift it. Check that the legs clear the water supply line.
In this guide
The wall above the toilet is some of the most unused space in a small bathroom. A freestanding over-the-toilet unit, sometimes called a space saver, puts two or three shelves there without anything going into the wall.
They’re simple pieces, but they’re also one of the most common bathroom returns. The usual problem is that the legs don’t clear the toilet or the lowest shelf blocks the tank lid.
What to measure
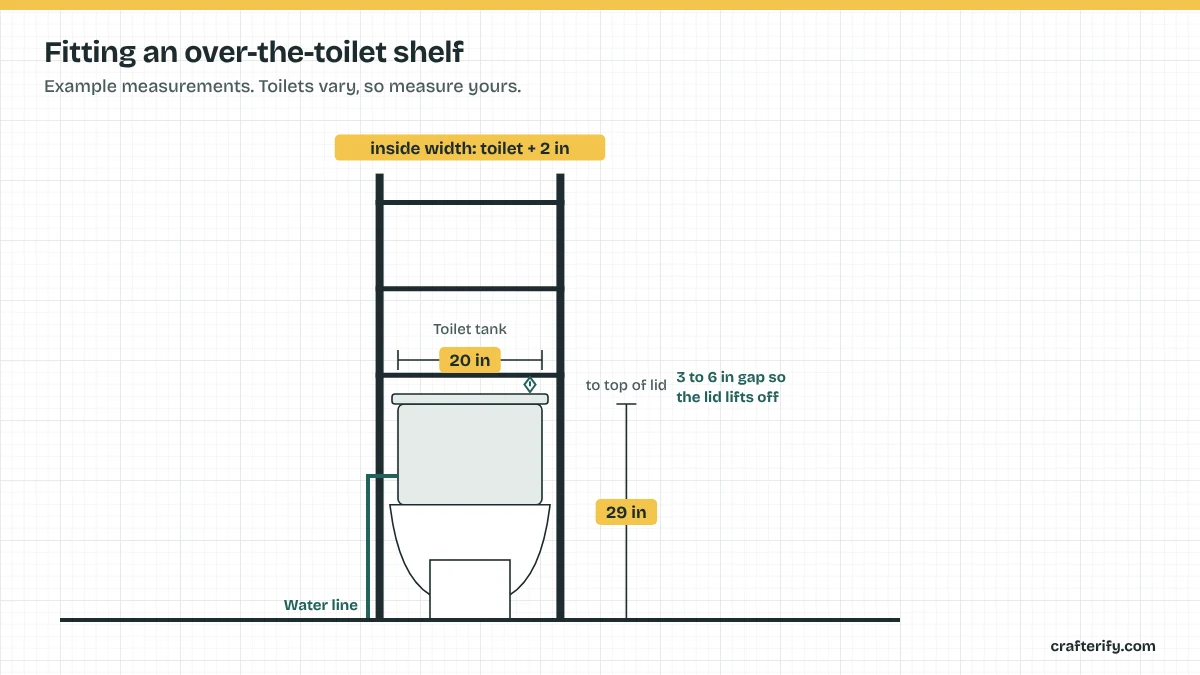
- Toilet width. Measure the widest point, which is usually the tank. Many are around 18 to 22 inches, but measure yours.
- Height to the top of the tank lid. Often around 28 to 31 inches from the floor.
- Tank depth. How far the tank sticks out from the wall, about 7 to 9 inches on many toilets.
- The water supply line. Note where it comes out of the wall or floor, usually on the left. The leg on that side has to clear it.
- Ceiling or obstacles above. A light fixture, window or towel bar can limit the height.
What to look for in the unit
| Feature | What you want |
|---|---|
| Inside width between legs | At least 2 in wider than your toilet |
| Height to the lowest shelf | 3 to 6 in above the tank lid, so it lifts off easily |
| Shelf depth | Shallow enough not to hit your head when standing, often 8 to 10 in |
| Adjustable feet or shelves | Helps on uneven bathroom floors |
| Anti-tip strap | Included with many units |
Some units have a cabinet with doors on top. That hides clutter, but it makes the piece heavier and more top-heavy. Open shelves are lighter and easier to see what’s there.
Keep it stable
Over-the-toilet units are tall and narrow, which makes them easy to knock over. A few things help:
- Keep the heaviest items on the lowest shelf. Extra toilet paper and towels are light; big bottles of shampoo are not.
- Push it flush to the wall, with all four feet on the floor.
- Use the anti-tip strap if your landlord allows it. It attaches with one small screw into the wall. If you can’t use it, keep the top shelf light.
What to put on it
The best things for over-the-toilet shelves are light and used often:
- Rolled hand towels and washcloths
- Toilet paper (two or three rolls)
- A small basket for daily skincare or hair items
- A small plant that does well in low light and humidity
Avoid glass bottles on the top shelf, and keep anything you don’t want to fall in the toilet in a basket with sides.
When to skip it
An over-the-toilet unit isn’t always the best choice:
- If the toilet is in a narrow alcove, there may not be room for the side legs.
- If the toilet sits under a window, a unit can block the light and make the window hard to open.
- If the bathroom is very small, a tall unit can make the room feel crowded.
In those cases, a slim rolling cart beside the vanity or an over-the-door organizer may be a better fit. See our guide to bathroom storage without a medicine cabinet for more options.
A tank-top tray
If you just want a little extra surface, a tray on top of the tank works for a candle or a small plant. Keep it small and light, and lift it off before removing the tank lid. Don’t stack heavy things on the lid, since lids are made of ceramic and can crack.
Common mistakes
- Measuring only the bowl. The tank is usually the widest part, and it’s what the legs have to clear.
- A first shelf too low. If you can’t lift the tank lid, you can’t fix a running toilet without moving everything.
- Forgetting the water line. A leg pressed against the supply line can loosen the connection.
- Heavy items up top. The unit becomes top-heavy and easy to knock over.
A sample setup
- Lowest shelf: rolled hand towels and a basket of spare toilet paper.
- Middle shelf: a lidded basket for daily skincare and a small plant.
- Top shelf: light items you use less often, like extra washcloths or cotton pads.
Leave the tank lid itself clear so you can reach inside if the toilet needs a quick fix.
FAQ
How wide should an over-the-toilet shelf be?
The inside width between the legs should be at least 2 inches wider than the widest part of your toilet, usually the tank.
Will an over-the-toilet unit fit any toilet?
Most fit standard toilets, but check the toilet width, the tank height and the water line before you buy. Wide or tall toilets need a unit with adjustable legs or more clearance.
Do over-the-toilet units need to be attached to the wall?
They stand on their own, but many include an anti-tip strap for safety. Ask your landlord before attaching it, and keep heavy items on the lowest shelf.